Article Name: Manage Assessments
Category/Module: Administration, Institution
Tags: Assessment, Results
Version: 3.75.21
Date Updated: 16 Aug 2022
This Assessments feature allows you to:
- As an Teacher/Principal, ability to spend less time finding, aggregating and managing assessment data
- As Homeroom Teacher, gain insights that allow them to use this data for reflection and continuous improvement
- As a Student/Parent/Teacher, total assessment management, with an integrated online grade book, which can be customised to your needs.
- Setup Templates (Administration)
- Setup Assessment Period (Administration)
- Setup Grading Types (Administration)
- Entering Results on Student Assessment (Institution)
- View Student Assessment Results (Institution)
- Enable Security Role Permission (Administration)
- Import Student Assessment
Setup Assessment Template
Create Assessment Template
1) Go to Administration > Assessments > Add
2) Enter all the required fields such (Name, Code, Academic Period etc.)
Scenario/Conditions:
- Classification is nullable and is use to aggregate mark by Subject Classification in custom excel template.
- E.g. English – 100% , Maths – 100%, Social Studies 50%
- Subject Weight will be 1, 1 and 0.5 respectively.
- Excel Template if left empty, it will be the auto-provided format in the system.
- Else, user may enhance the given Excel Template and upload them in the system.
3) DownloadExcel Template and amend the layout (if needed)
4) Browse and Attach the Updated Excel Template > Save.
5) The message will be displayed upon adding successfully.
Edit Assessment Template
1) Go to Administration > Assessments
2) You will be able to see all the Assessments being created.
3) Select Action Bar > Edit.
4) You will only be able to edit those fields that are not greyed out.
5) Update the Code, Name, Weight and Classification >Save.
6) The message will be displayed upon updating successfully.
View Assessment Template
1) Go to Administration > Assessments
2) You will be able to see all the Assessments being created.
3) Select Action Bar > View.
4) You will be able to see Additional details of Assessment record
5) Similarly, you will be able to update or delete the record.
Delete Assessment Template
1) Go to Administration > Assessments
2) You will be able to see all the Assessments being created.
3) Select Action Bar > Delete.
4) You will not be able to delete if the Assessments have associated records.
5) Else, if there are no associated record > Save.
6) You will be able to delete successfully.
Setup Assessment Period
Create Assessment Period
1) Go to Administration > Assessments > Assessment Periods > Add
2) Enter all the required fields such (Name, Code, Academic Period etc.)
Scenario/Conditions:
- Start Date and End Date fields will determine the data included in the Assessment Report.
- Date Enabled and Disabled will determine if user are able to edit the Assessment Results.
- If Academic Term text entered is same through out the Assessments, all Academic Period will be displayed in the same term dropdown-list.
- Period Weight refers to the percentage for the Assessment Period.
- E.g. Mid-term Assessment – Term 1 (0.25%) + Final Assessment for Term 1 (0.75%) = Term 1 Assessment Total
- E.g.Mid-term Assessment – Term 2 (0.25%) + Final Assessment for Term 2 (0.75%) = Term 2 Assessment Total
3) Upon selecting the Template, System will list the Subjects and able to select Grading Types > Save.
4) The message will be displayed upon adding successfully.
Edit Assessment Period
1) Go to Administration > Assessments > Assessment Periods
2) You will be able to see all the Assessments being created.
3) Select Action Bar > Edit.
4) You will only be able to edit all fields> Save.
5) The message will be displayed upon updating successfully.
View Assessment Period
1) Go to Administration > Assessments > Assessment Periods
2) You will be able to see all the Assessment being created.
3) Select Action Bar > View.
4) You will be able to see Additional details of Assessment record
5) Similarly, you will be able to update or delete the record.
Delete Assessment Period
1) Go to Administration > Assessments > Assessment Periods
2) You will be able to see all the Assessments being created.
3) Select Action Bar > Delete.
4) You will not be able to delete if the Assessment have associated records.
5) Else, if there are no associated record > Save.
6) You will be able to delete successfully.
Setup Assessment Grading Type
Create Assessment Grading Type
1) Go to Administration > Assessments > Grading Types > Add
2) Enter all the required fields such (Name, Result Type, Max etc.)
3) Select Add New Option, enter other options > Save.
4) The message will be displayed upon adding successfully.
Edit Assessment Grading Type
1) Go to Administration > Assessments > Assessment Periods
2) You will be able to see all the Assessments Grading Types being created.
3) Select Action Bar > Edit.
4) You will only be able to edit all fields> Save.
5) The message will be displayed upon updating successfully.
View Assessment Grading Type
1) Go to Administration > Assessments > Assessment Periods
2) You will be able to see all the Assessment Grading Types being created.
3) Select Action Bar > View.
4) You will be able to see Additional details of Assessment record
5) Similarly, you will be able to update or delete the record.
Delete Assessment Grading Type
1) Go to Administration > Assessments > Assessment Periods
2) You will be able to see all the Assessments Grading Types being created.
3) Select Action Bar > Delete.
4) You will not be able to delete if the Grading Type have associated records.
5) Else, if there are no associated record > Save.
6) You will be able to delete successfully.
Entering Results on Student Assessments
Enter Results for Student Assessment
1) Go to Institution > Assessments > Select Class
2) Select the Semester of the Assessment, and enter the marks accordingly.
3) System will calculate based on the period weight and total of the Assessments based by the Term.
4) Marks entered will be Auto-saved.
5) User may choose to Export the Assessment Results upon entering.
View Student Assessment Results
View Results for Student Assessment
1) Go to Institution > Students
2) Select on the Academic tab under Student > Assessments.
3) User will be able to view the Results entered by the Teachers
Enable Security Role Permission
Enable Permission for Student Assessment Results
1) Go to Administration > Security > Roles
2) Select on the Security Role and Allow all the Permission for the following actions.

Import Student Assessment
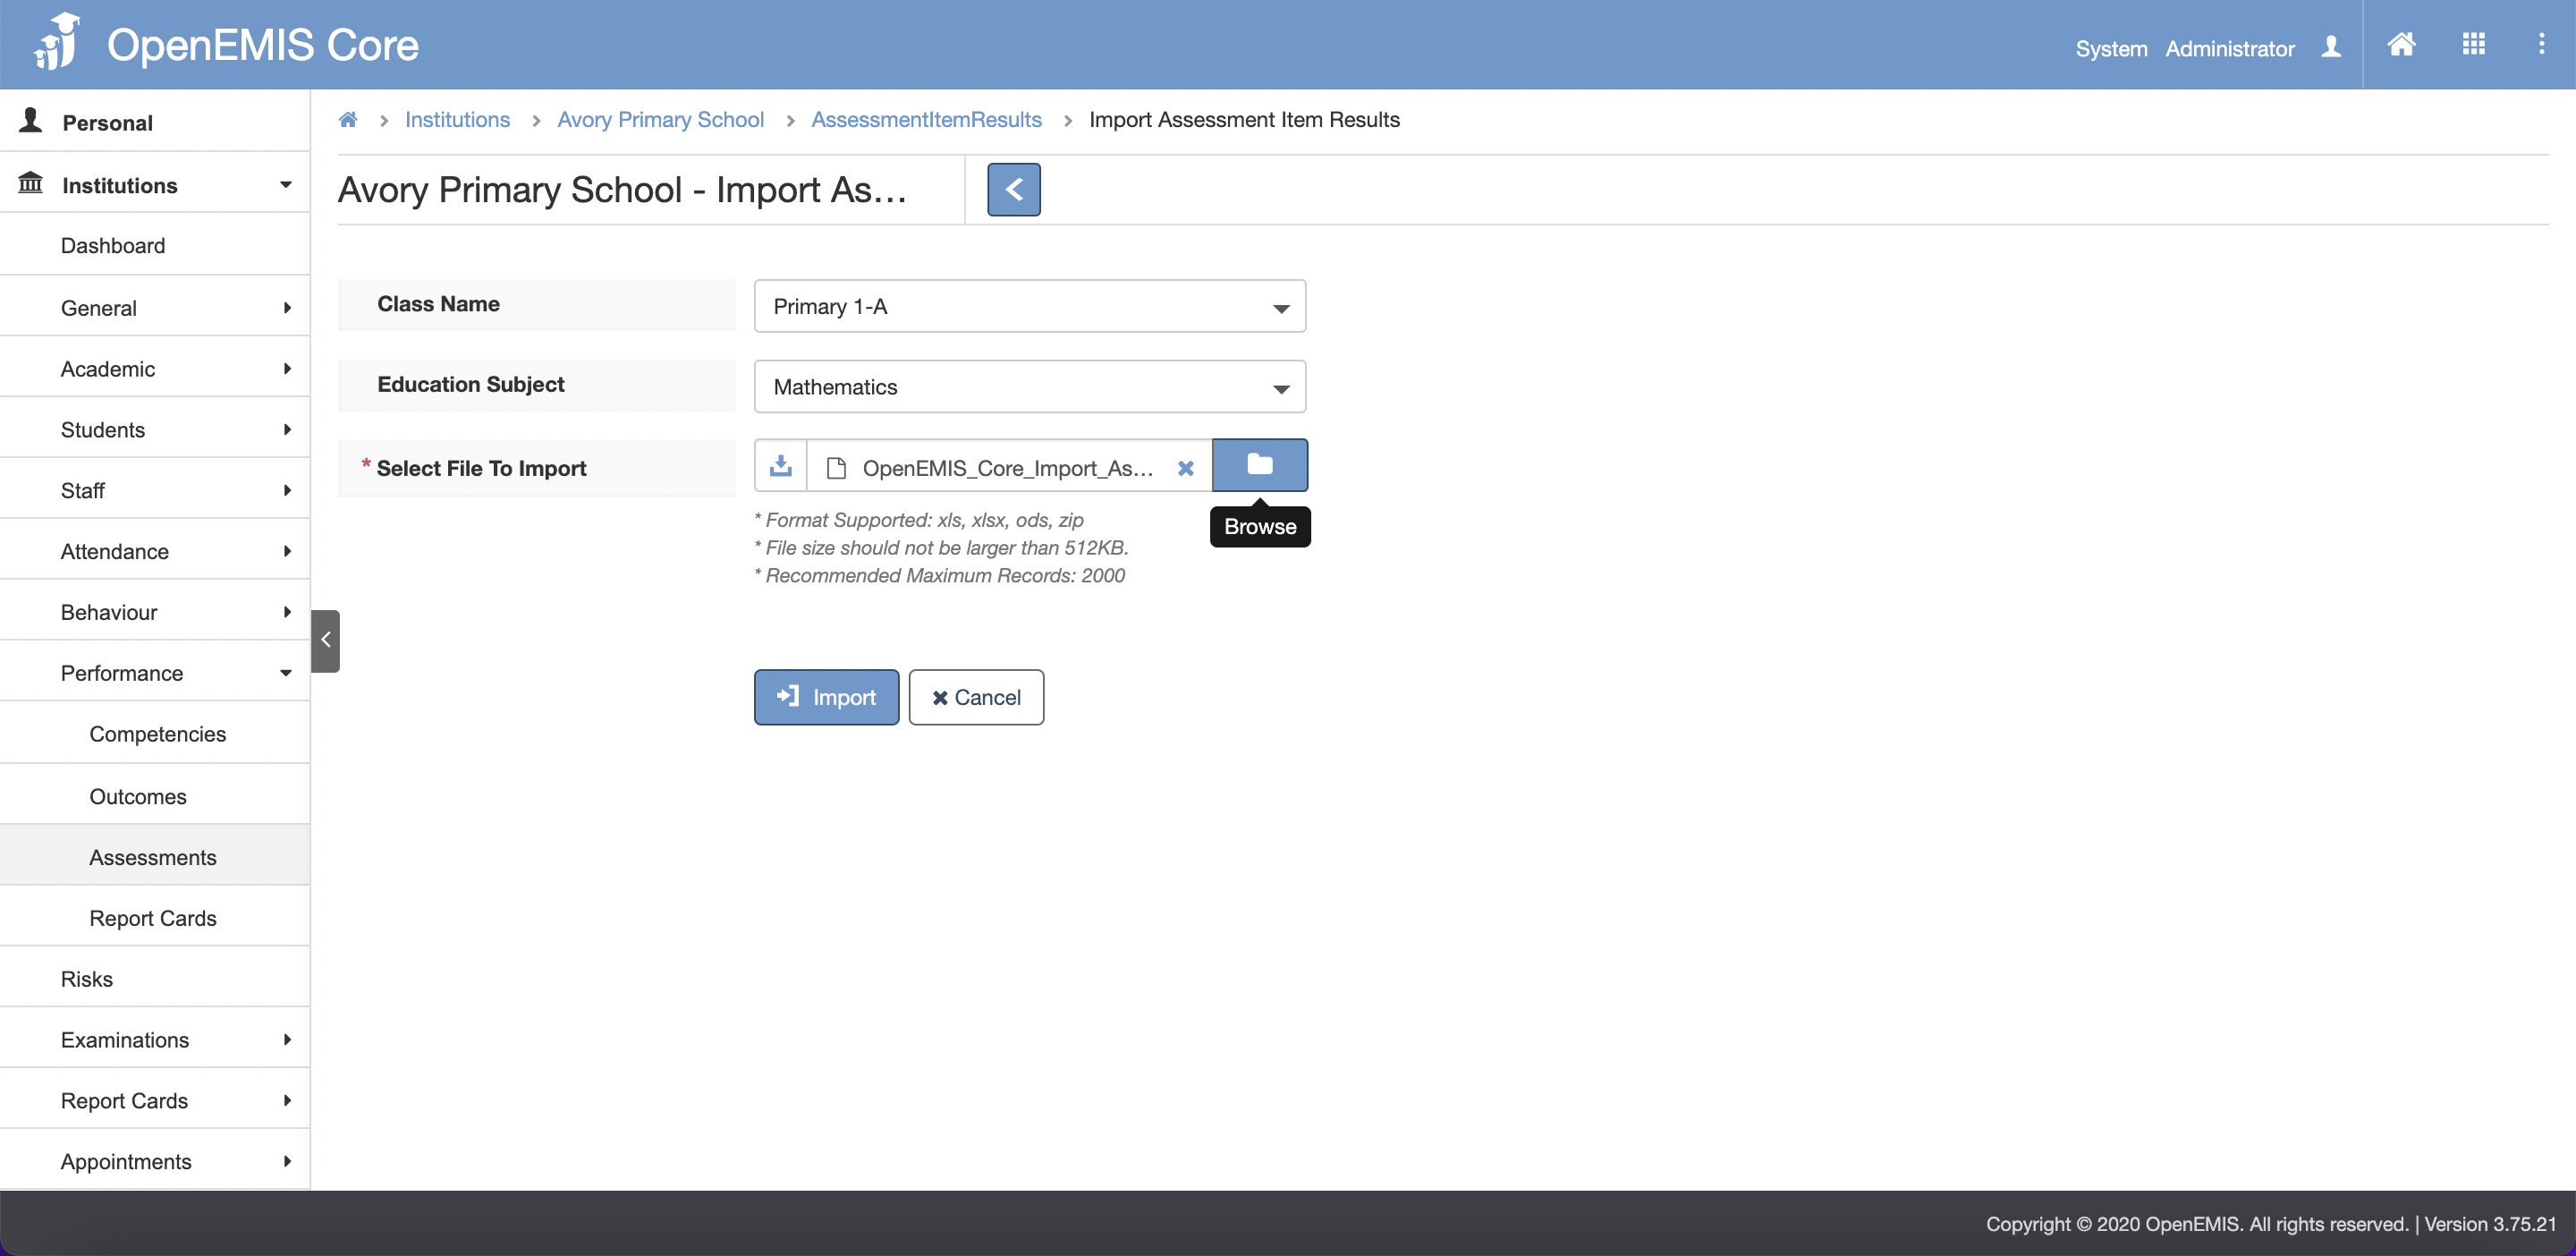
1) Go to Institution > Performance > Assessments
2) Select Add

3) Click on the Download Template button

4) Fill in the excel file

5) After download, click the Browse button
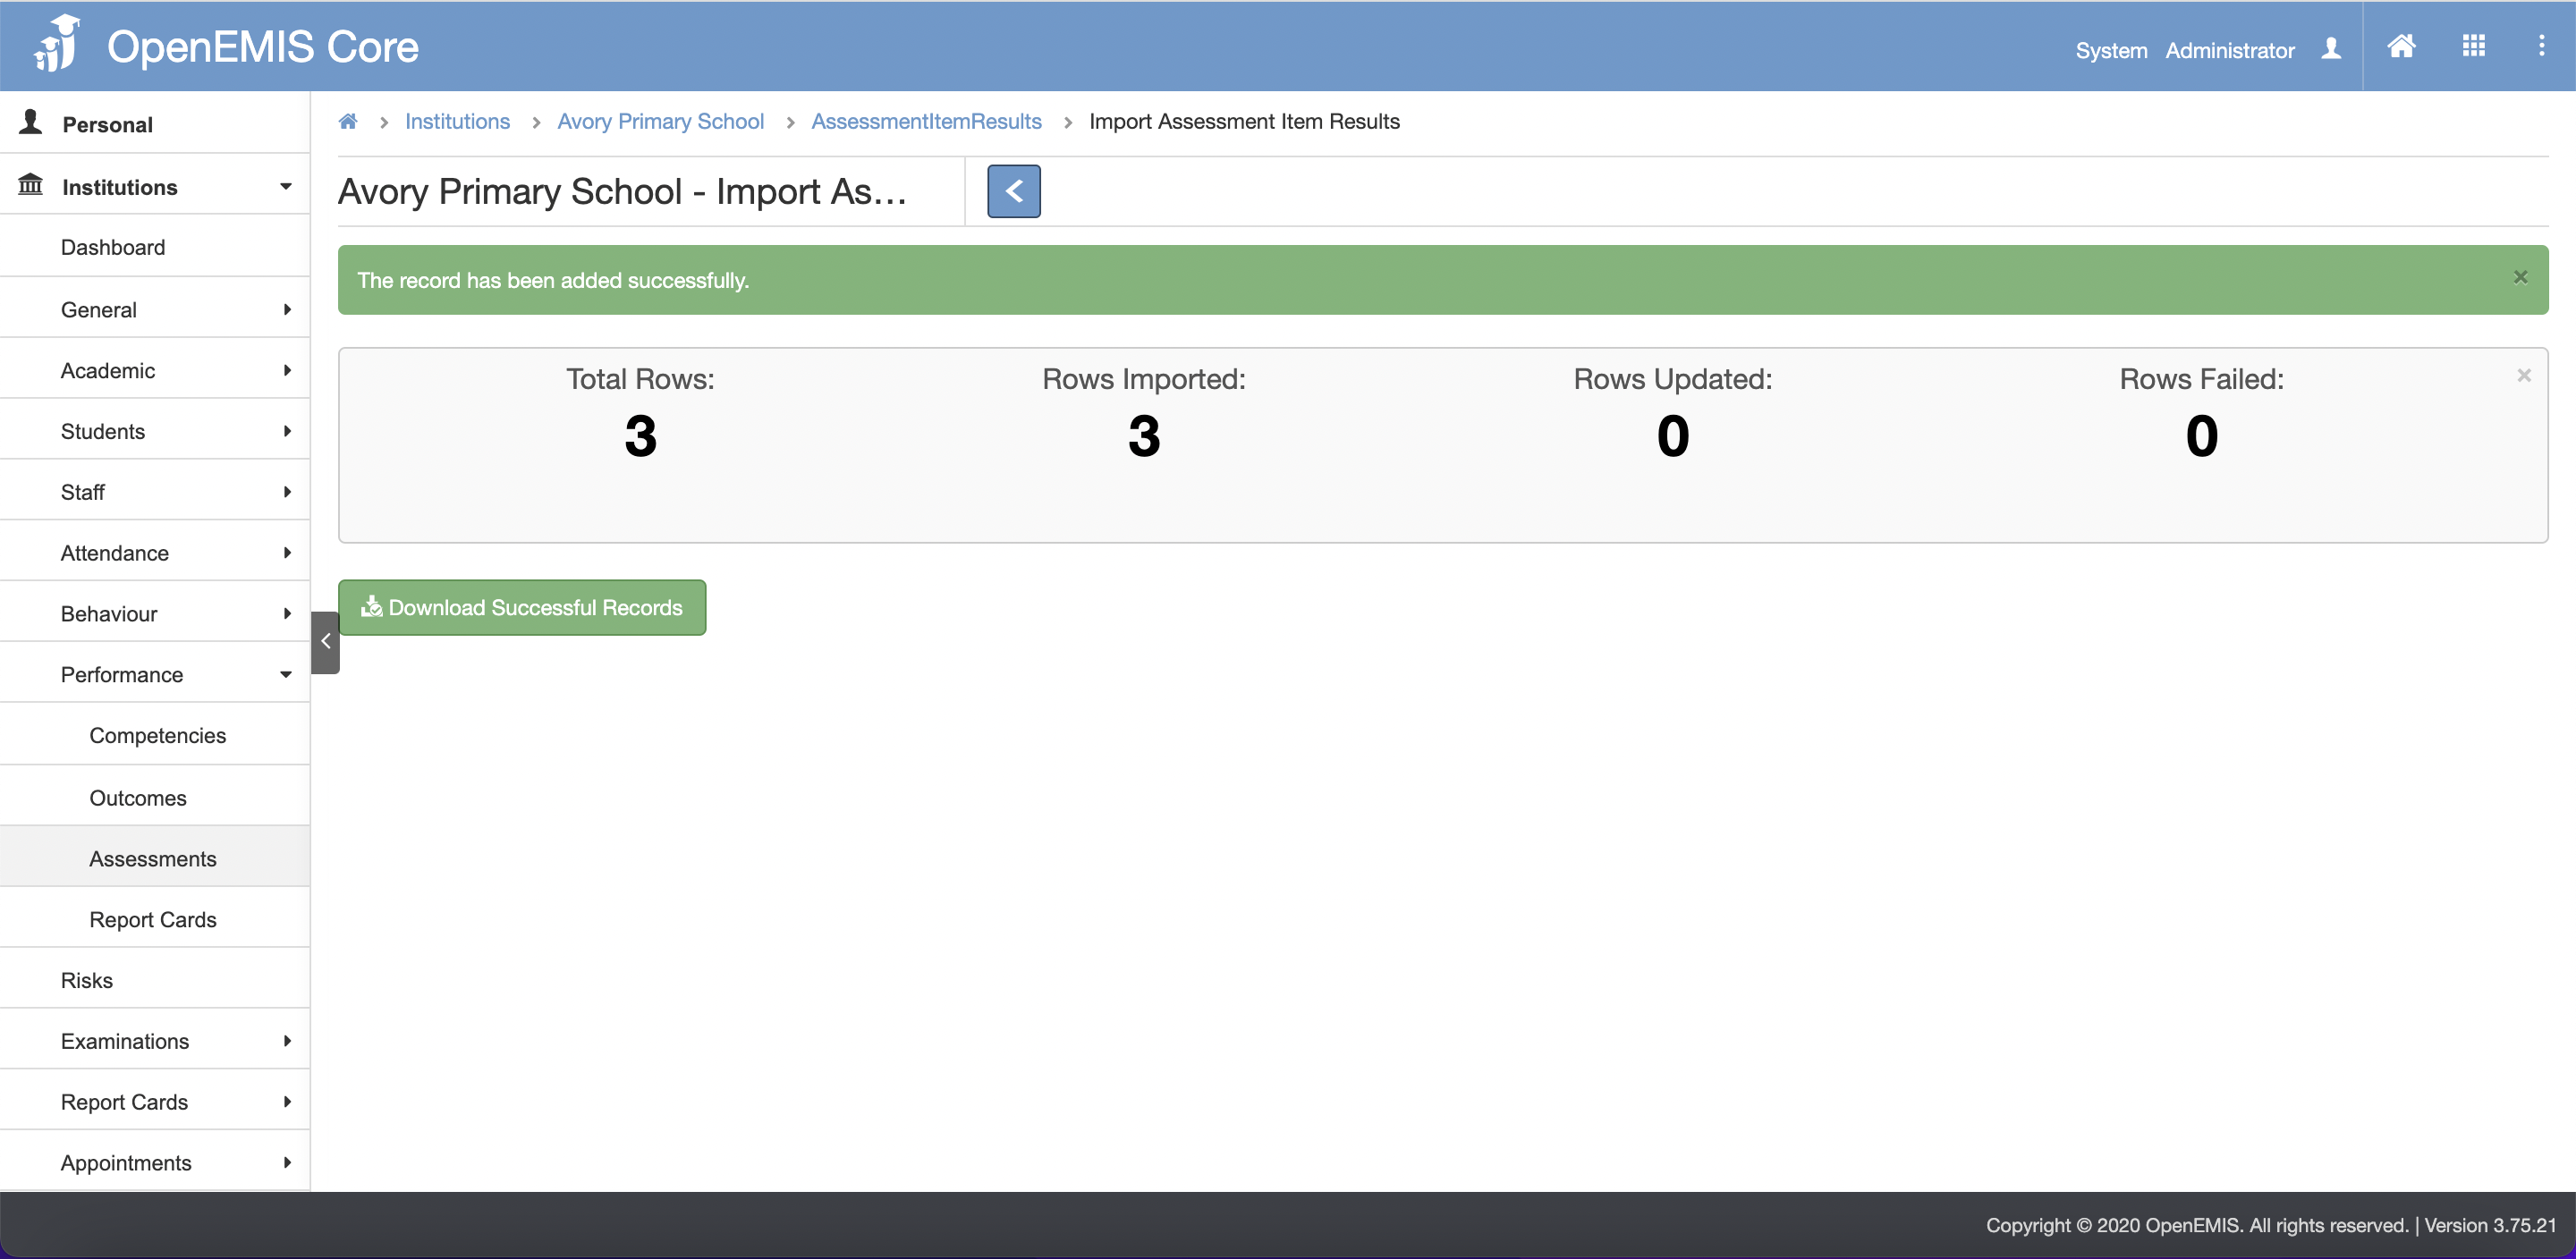
6) Then click the Import button
7) There will be a successful message indicating that record has been added successfully.